
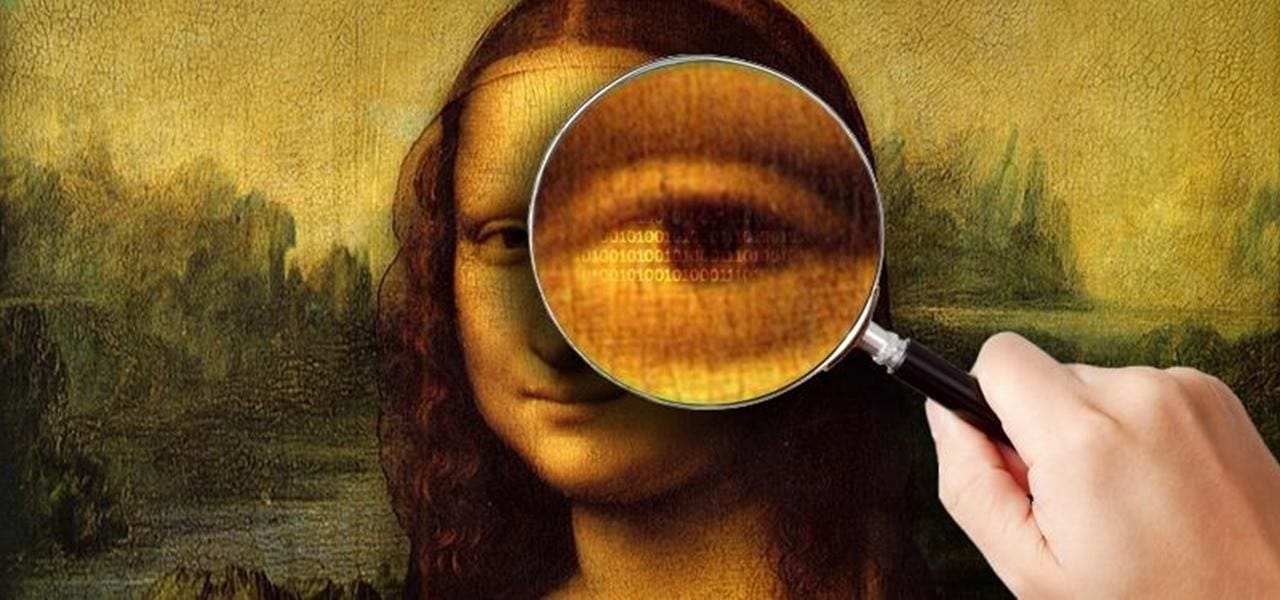
Steganography: Hiding an image inside another
In this story, we will learn some image processing concepts and how to hide an image inside another image file.
To provide a functional example, it was implemented a Python class to perform the procedures mentioned in the end of this story.
First of all, let’s understand what is steganography, digital images, pixels, and color models.
What is steganography?
Steganography is the practice of concealing a file, message, image, or video within another file, message, image, or video.
What is the advantage of steganography over cryptography?
The advantage of steganography over cryptography alone is that the intended secret message does not attract attention to itself as an object of scrutiny. Plainly visible encrypted messages, no matter how unbreakable they are, arouse interest and may in themselves be incriminating in countries in which encryption is illegal.
In
other words, steganography is more discreet than cryptography when we
want to send a secret information. On the other hand, the hidden message
is easier to extract.
What is a digital image?
Ok, now that we know the basics of steganography, let’s learn some simple image processing concepts.
Before understanding how can we hide an image inside another, we need to understand what a digital image is.
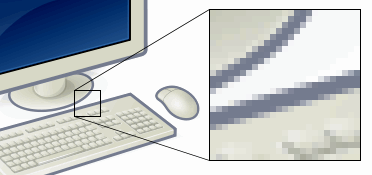
We can describe a digital image
as a finite set of digital values, called pixels. Pixels are the
smallest individual element of an image, holding values that represent
the brightness of a given color at any specific point. So we can think
of an image as a matrix (or a two-dimensional array) of pixels which
contains a fixed number of rows and columns.
When using the “digital image” term here, we are referencing to the “raster graphics”,
which are basically a dot matrix data structure, representing a grid of
pixels, which in turn can be stored in image files with varying
formats. You can read more about digital images, raster graphics, and bitmaps at the Wikipedia website.
Pixel concept and color models
As
already mentioned, pixels are the smallest individual element of an
image. So, each pixel is a sample of an original image. It means, more
samples provide more accurate representations of the original. The intensity
of each pixel is variable. In color imaging systems, a color is
typically represented by three or four component intensities such as red, green, and blue, or cyan, magenta, yellow, and black.
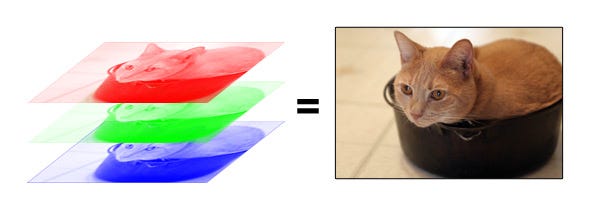
Here, we will work with the RGB color model. As you can imagine, the RGB color model has 3 channels, red, green and blue.
The RGB color model is an additive color model in which red, green and blue light are added together in various ways to reproduce a broad array of colors. The name of the model comes from the initials of the three additive primary colors, red, green, and blue. The main purpose of the RGB color model is for the sensing, representation and display of images in electronic systems, such as televisions and computers, though it has also been used in conventional photography.
So, each pixel from the image is composed of 3 values (red, green, blue) which are 8-bit values (the range is 0–255).
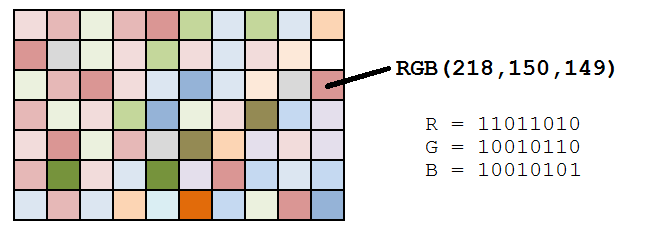
As we can see in the image above, for each pixel we have three values, which can be represented in binary code (the computer language).
When working with binary codes, we have more significant bits and less significant bits, as you can see in the image below.
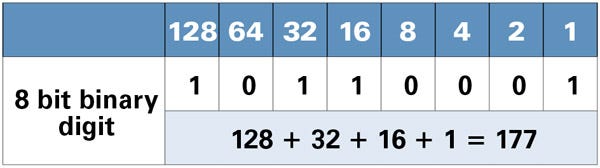
The leftmost bit is the most significant bit. If we change the leftmost bit it will have a large impact on the final value. For example, if we change the leftmost bit from 1 to 0 (11111111 to 01111111) it will change the decimal value from 255 to 127.
On the other hand, the rightmost bit is the less significant bit. If we change the rightmost bit it will have less impact on the final value. For example, if we change the leftmost bit from 1 to 0 (11111111 to 11111110) it will change the decimal value from 255 to 254. Note that the rightmost bit will change only 1 in a range of 256 (it represents less than 1%).
Summarizing:
each pixel has three values (RGB), each RGB value is 8-bit (it means we
can store 8 binary values) and the rightmost bits are less significant.
So, if we change the rightmost bits it will have a small visual impact
on the final image. This is the steganography key to hide an image
inside another. Change the less significant bits from an image and
include the most significant bits from the other image.
Hiding an image inside another
Since we understood the pixel concept and color models, we can talk about the procedure of hiding an image inside another.
In this section, we can find a step-by-step of the hide and reveal process using Python code.
Hiding an Image:
- To hide an image inside another, the image which will be hidden needs to have at most the same size of the image which will hide it.
| if img2.size[0] > img1.size[0] or img2.size[1] > img1.size[1]: | ||
# Get the pixel map of the two images
pixel_map1 = img1.load()
pixel_map2 = img2.load()

# Create a new image that will be outputted
new_image = Image.new(img1.mode, img1.size)
pixels_new = new_image.load()

for i in range(img1.size[0]):
    for j in range(img1.size[1]):
3. So, we get the RGB from the image 1 and image 2 as binary values:
rgb1 = Steganography.__int_to_bin(pixel_map1[i, j])

# Use a black pixel as default
rgb2 = Steganography.__int_to_bin((0, 0, 0))

# Check if the pixel map position is valid for the second image
if i < img2.size[0] and j < img2.size[1]:
    rgb2 = Steganography.__int_to_bin(pixel_map2[i, j])
We can use the __int_to_bin method to convert a decimal value to a binary value:
@staticmethod
def __int_to_bin(rgb):
    """
    Convert an integer tuple to a binary (string) tuple.
    :param rgb: An integer tuple (e.g. (220, 110, 96))
    :return: A string tuple (e.g. ("00101010", "11101011", "00010110"))
    """
    r, g, b = rgb
    return ('{0:08b}'.format(r),
            '{0:08b}'.format(g),
            '{0:08b}'.format(b))
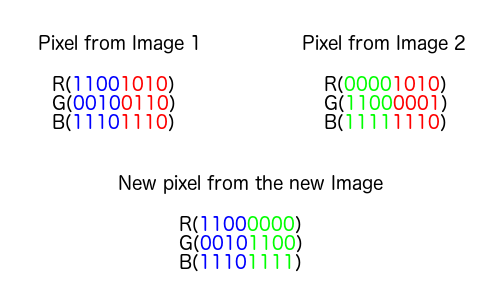
4. We merge the most significant bits from the image 1 with the most significant bits from the image 2:
# Merge the two pixels and convert it to a integer tuple
rgb = Steganography.__merge_rgb(rgb1, rgb2)
Using the __merge_rgb method:
@staticmethod
def __merge_rgb(rgb1, rgb2):
    """
    Merge two RGB tuples.
    :param rgb1: A string tuple (e.g. ("00101010", "11101011", "00010110"))
    :param rgb2: Another string tuple (e.g. ("00101010", "11101011", "00010110"))
    :return: An integer tuple with the two RGB values merged.
    """
    r1, g1, b1 = rgb1
    r2, g2, b2 = rgb2
    rgb = (r1[:4] + r2[:4],
           g1[:4] + g2[:4],
           b1[:4] + b2[:4])
    return rgb
Note that the __merge_rgb
function is using the 4 most significant bits from each image, but it
could be changed. Keep in mind that using fewer bits from the hidden
image will result in low quality of the recovery image.
5. Finally, we convert the new binary value to a decimal value:
pixels_new[i, j] = Steganography.__bin_to_int(rgb)
Using the __bin_to_int method:
@staticmethod
def __bin_to_int(rgb):
    """
    Convert a binary (string) tuple to an integer tuple.
    :param rgb: A string tuple (e.g. ("00101010", "11101011", "00010110"))
    :return: Return an int tuple (e.g. (220, 110, 96))
    """
    r, g, b = rgb
    return (int(r, 2),
            int(g, 2),
            int(b, 2))
And set it to a new pixel position from the resulted image.
Now we have an image hidden inside another image.
The entire merge method can be found here.
Revealing an Image:
# Load the pixel map
pixel_map = img.load()

# Create the new image and load the pixel map
new_image = Image.new(img.mode, img.size)
pixels_new = new_image.load()

# Tuple used to store the image original size
original_size = img.size

for i in range(img.size[0]):
    for j in range(img.size[1]):
3. So, we extract each RGB channel as a binary value from the current pixel:
# Get the RGB (as a string tuple) from the current pixel
r, g, b = Steganography.__int_to_bin(pixel_map[i, j])
Using the __int_to_bin method:
@staticmethod
def __int_to_bin(rgb):
    """
    Convert an integer tuple to a binary (string) tuple.
    :param rgb: An integer tuple (e.g. (220, 110, 96))
    :return: A string tuple (e.g. ("00101010", "11101011", "00010110"))
    """
    r, g, b = rgb
    return ('{0:08b}'.format(r),
            '{0:08b}'.format(g),
            '{0:08b}'.format(b))
4.
Then, we create a new RGB value by concatenating only the 4 rightmost
bits from the current pixel with zero values (to create a new 8-bit
value):
# Extract the last 4 bits (corresponding to the hidden image)
# Concatenate 4 zero bits because we are working with 8 bit values
rgb = (r[4:] + "0000",
       g[4:] + "0000",
       b[4:] + "0000")
5. Finally, we convert the binary value to a decimal value and set it to the current pixel in the new image:
# Convert it to an integer tuple
pixels_new[i, j] = Steganography.__bin_to_int(rgb)
6.
The developed algorithm has only one more last step to remove the black
borders when the hidden image was smaller than the image which is
hiding it.
# If this is a 'valid' position, store it
# as the last valid position
if pixels_new[i, j] != (0, 0, 0):
    original_size = (i + 1, j + 1)

# Crop the image based on the 'valid' pixels
new_image = new_image.crop((0, 0, original_size[0], original_size[1]))
You can check out the result in the following image:
The
left upper image is the image that will hide the right upper image. The
left lower image is the two images merged and the right lower image is
the extracted (unmerged) image.
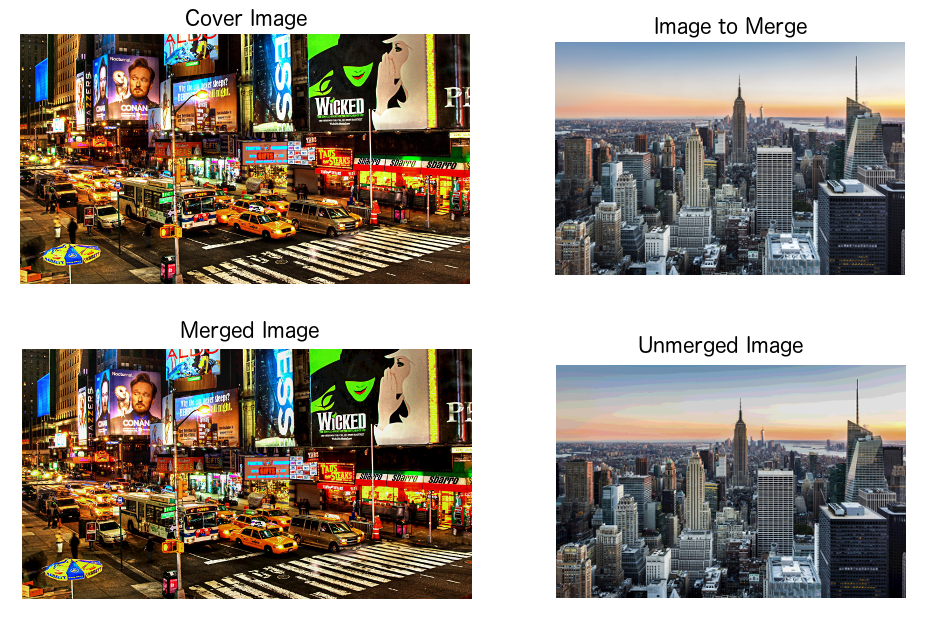
As
you can see in the image above, we lost some image quality in the
process, but this does not interfere with image comprehension.
You can find the Steganography Python code on Github: https://github.com/kelvins/steganography
|


No comments
Please do not enter any spam link in comment box.